
| Orig. Posting Date | User Name | Edit Date |
| Mar 30, 2020 08:30AM | dklawson | |
| Mar 30, 2020 06:16AM | 6464 | |
| Mar 29, 2020 01:35PM | dklawson | |
| Mar 29, 2020 12:00PM | Derek81 | |
| Mar 28, 2020 01:27PM | Alex | |
| Mar 28, 2020 01:24PM | dklawson | Edited: Mar 28, 2020 01:26PM |
| Mar 28, 2020 12:37PM | Dan Moffet | |
| Mar 28, 2020 12:11PM | Derek81 | |
| Mar 28, 2020 08:32AM | 6464 | |
| Mar 28, 2020 04:32AM | Dan Moffet | |
| Mar 27, 2020 04:54PM | Dr Mini | |
| Mar 27, 2020 04:19PM | croc7 | |
| Mar 27, 2020 03:58PM | ve9aa | |
| Mar 27, 2020 12:09PM | Derek81 | Edited: Mar 27, 2020 12:14PM |
| Mar 27, 2020 10:01AM | jedduh01 | |
| Mar 27, 2020 08:15AM | Dr Mini | |
| Mar 27, 2020 05:29AM | dklawson | |
| Mar 26, 2020 08:45PM | Kermy | |
| Mar 26, 2020 07:50PM | TK | |
| Mar 26, 2020 04:44PM | Derek81 |

|
Total posts: 9241
Last post: Aug 17, 2023 Member since:Jun 5, 2000
|
Cars in Garage: 0
Photos: 0 WorkBench Posts: 0 |
|
Regardless of whether your bypass hose (between the head and water pump) appears to be in good condition or not, replacing it when fitting the new pump is prudent. Whatever you do, do NOT install the emergency repair "accordion" hose. The heater hose mentioned by 6464 is the way to go.
As for this being an easy job... I'd say that is true on cars with the 1-piece fan shroud. I hate having to touch the fan or radiator on my Mk1.
|
|
Total posts: 1723
Last post: Oct 20, 2020 Member since:Jun 18, 1999
|
Cars in Garage: 0
Photos: 0 WorkBench Posts: 0 |
|
|
|
Total posts: 9241
Last post: Aug 17, 2023 Member since:Jun 5, 2000
|
Cars in Garage: 0
Photos: 0 WorkBench Posts: 0 |
|
See the link below to our host's catalog page discussing the various water pump types.
https://www.minimania.com/Classic_Mini_Cooper_Water_Pumps___Thermostats_page_16
|
|
Total posts: 4
Last post: Mar 29, 2020 Member since:Mar 26, 2020
|
Cars in Garage: 0
Photos: 0 WorkBench Posts: 0 |
Thanks all for the help btw, now to figure out how to reset the emergency lock off for my brakes.
|
|
Total posts: 10237
Last post: Apr 9, 2024 Member since:Mar 24, 1999
|
Cars in Garage: 0
Photos: 0 WorkBench Posts: 0 |
|
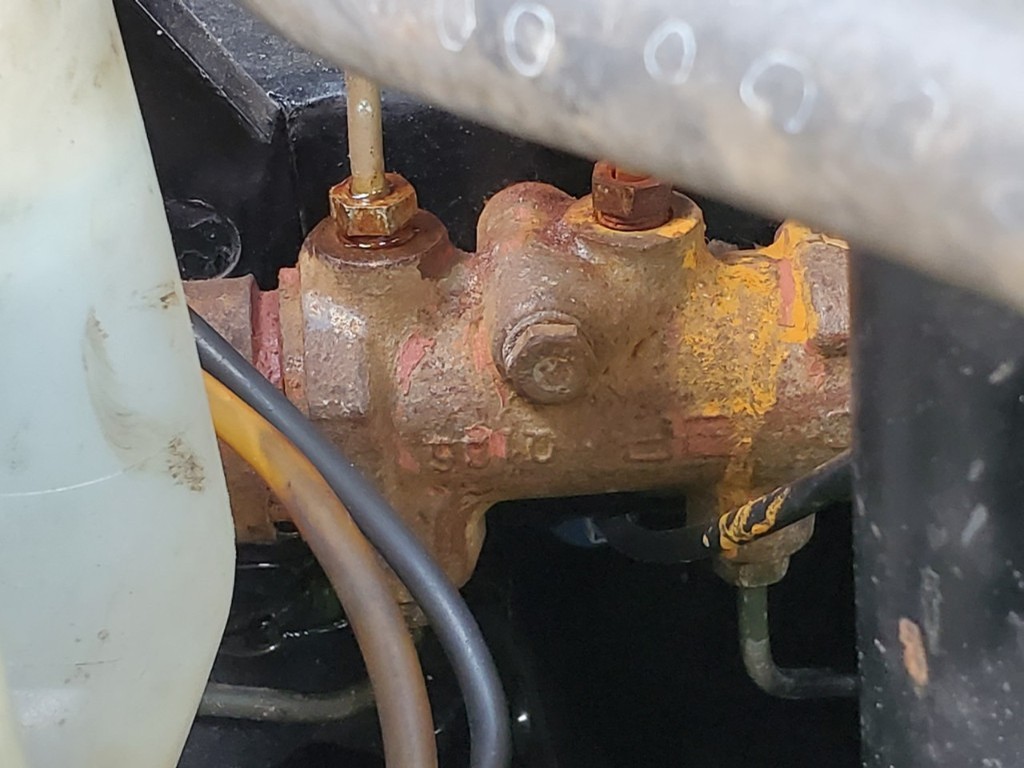
The valve pictured (often mistakenly called a PDWA valve) is an emergency lock-off for either the front or the rear brake circuit. If either end loses pressure a shuttle moves across in the body and isolates the leaking bit.
Balance front/rear is done by having a stepped bore in the actual master cylinder and changing the rear wheel cylinder bore size to match the application.
If you bleed the brakes improperly it isn't difficult to fire this valve and lock off the back end - it's also a total bugger to reset it...
|
|
Total posts: 9241
Last post: Aug 17, 2023 Member since:Jun 5, 2000
|
Cars in Garage: 0
Photos: 0 WorkBench Posts: 0 |
|
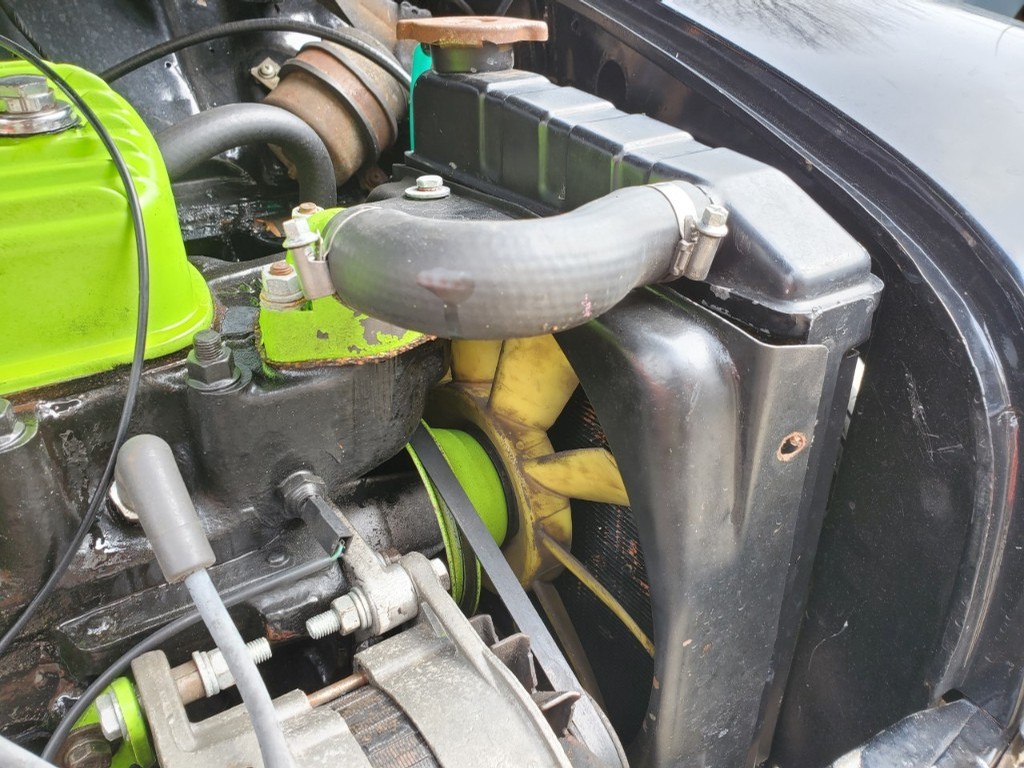
The fan belt doesn't look like it goes to a water pump, so....where is it?
If you want a new T-stat, go to the local parts store and ask for a Stant thermostat for a 1970s GM (anything) (180 degrees is Stant #29358).
That pulley between the engine block and fan is mounted on the water pump.
I defer to others regarding the brake valve.
|
|
Total posts: 9539
Last post: Apr 13, 2024 Member since:Aug 14, 2002
|
Cars in Garage: 0
Photos: 0 WorkBench Posts: 0 |
|
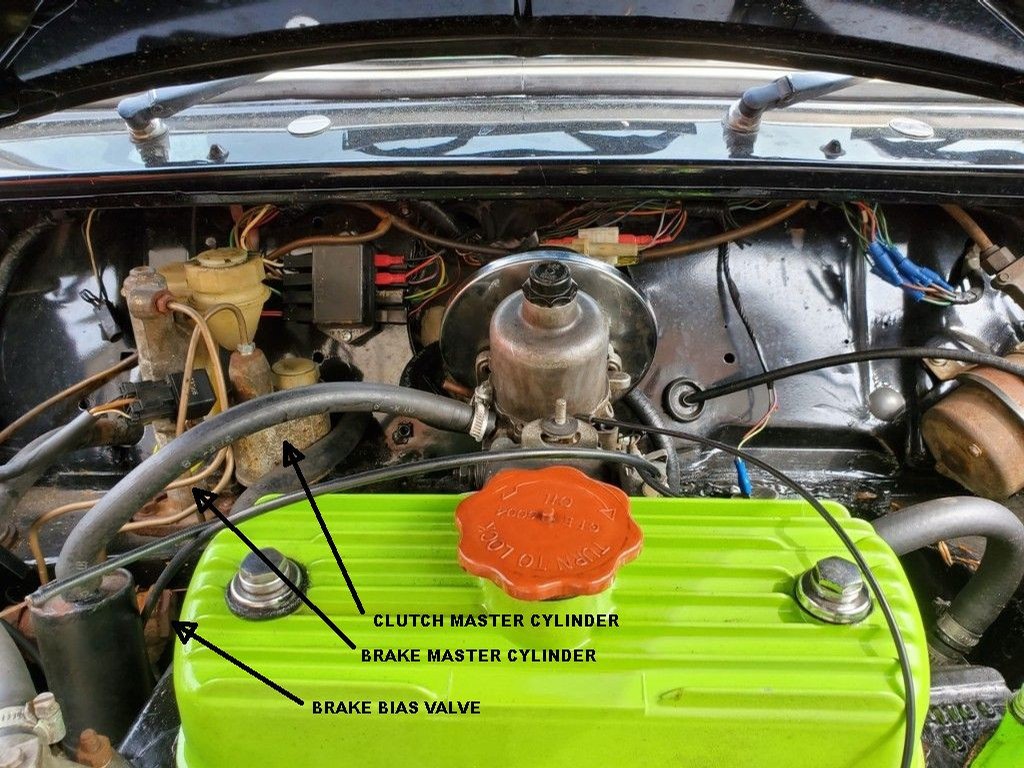 That is the brake system bias or proportioning valve. It limits the amount of brake pressure going to the rear wheels.
The attached picture shows which is which.
.
"Hang on a minute lads....I've got a great idea."
|
|
Total posts: 4
Last post: Mar 29, 2020 Member since:Mar 26, 2020
|
Cars in Garage: 0
Photos: 0 WorkBench Posts: 0 |
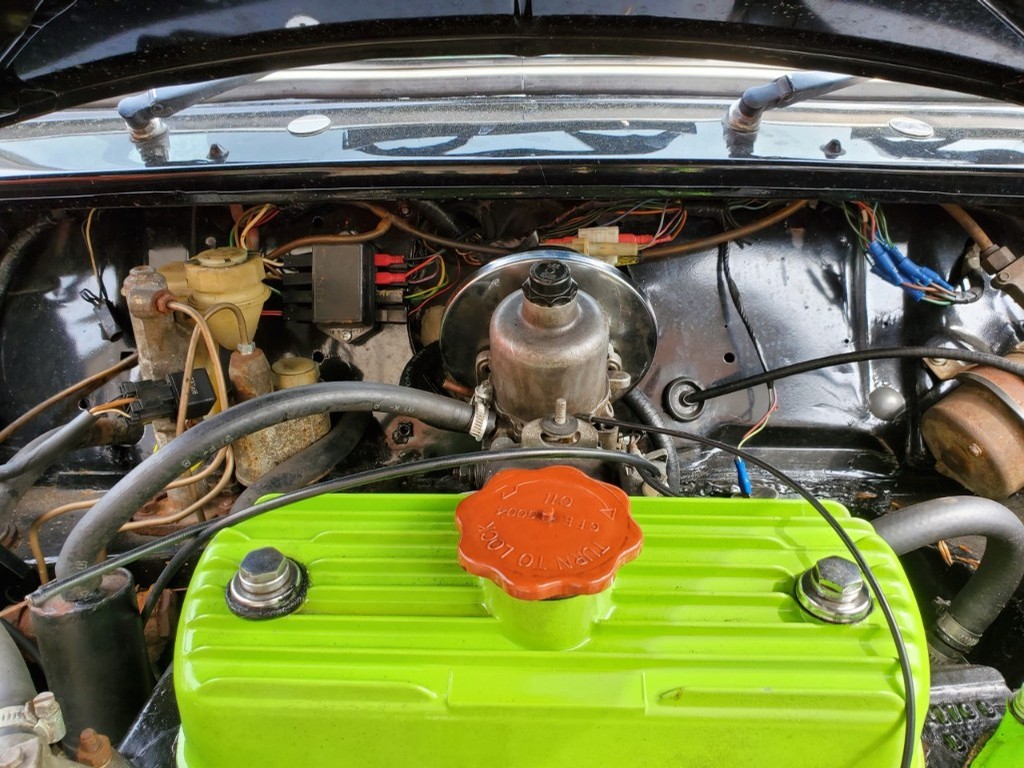
 So I have an update. I took my rad cap off and ran the car. There doesn't look to be any flow in there. I pulled the hose off the top of the rad and it was dry, doesn't look like water has been in there in a bit. I'm waiting for the engine to cool down enough to get the thermostat out. I just happen to have a 2nd one I can throw in.
 The fan belt doesn't look like it goes to a water pump, so....where is it?
Side note:
I am trying to fix my brakes, In the process of bleeding them, I get fluid out of the front two calipers, but nothing out of the back two.
Looking at the brake master cylinder (i think that's whats in the picture) i get fluid out of the left two lines, but nothing out of the right two.
Is that something a rebuild will fix or am i way off?
|
|
Total posts: 1723
Last post: Oct 20, 2020 Member since:Jun 18, 1999
|
Cars in Garage: 0
Photos: 0 WorkBench Posts: 0 |
|
|
|
Total posts: 9539
Last post: Apr 13, 2024 Member since:Aug 14, 2002
|
Cars in Garage: 0
Photos: 0 WorkBench Posts: 0 |
|
.
"Hang on a minute lads....I've got a great idea."
|
|
Total posts: 7050
Last post: Apr 10, 2024 Member since:May 23, 2002
|
Cars in Garage: 0
Photos: 0 WorkBench Posts: 0 |
|
"Retired: No Job, No Money, Wife and I! Will travel anywhere for Minis"
|
|
Total posts: 834
Last post: Mar 7, 2023 Member since:Aug 15, 2002
|
Cars in Garage: 0
Photos: 0 WorkBench Posts: 0 |
|
|
|
Total posts: 8592
Last post: Apr 6, 2024 Member since:Sep 30, 2002
|
Cars in Garage: 4
Photos: 40 WorkBench Posts: 2 |
|
Stuck thermostat?
Non functional waterpump?
Blown Headgasket?
My $$ is on one of the first 2 guesses. You should be able to determine which is which. (ie: Without a thermostat installed, see if you have flow--feel the rad hoses and heater hoses)
At worst you could REMOVE the thermostat and stick into a pot of boiling water and watch it open to verify proper operation. Depending on the outcome, you can always run the car (in your driveway) without the thermostat, to then see if you have flow.
Others more well versed than I can tell you how to troubleshoot the waterpump. I'm sure there must be a way.
~ 30 minutes in a Mini is more therapeutic than 3 sessions @ the shrink. ~
Mike ![]() NB, Canada
NB, Canada
|
|
Total posts: 4
Last post: Mar 29, 2020 Member since:Mar 26, 2020
|
Cars in Garage: 0
Photos: 0 WorkBench Posts: 0 |

Here is my rad cap, it looks like its 15psi right now
Sorry, I didn't put oil IN the intake, I put it in the "dashspot"
The car has not overheated in the many years I've had it in the states. It has just started within the past year. I'm not sure what has changed.
I have the coolant in the radiator about 1 inch from the top. I usually just fill it full and then let it over flow to get the level it wants.
I made sure its got the 20-w50 oil.
It over heats in my driveway, I'm not driving it anywhere, its not registered right now. In my driveway it goes from cold to over heating in less than 10 min. I have messed with the fuel mixture because it was so rich anyone riding in the car would smell like fuel after. I took the idle up about 100 rpm because the car would die at stop lights unless i kept choke out a tiny bit.
Back in England I did take the thermostat out and put it in boiling water to check the temperature it opened, and all was well. Granted that was 8 years ago-ish.
I hope it is as simple as turning the fan around.
|
|
Total posts: 1649
Last post: Jun 22, 2022 Member since:Apr 30, 2009
|
Cars in Garage: 0
Photos: 0 WorkBench Posts: 0 |
|
A Harbor freight Infared Thermometer is a great quick way to point and shoot and see temperatures.
Get the engine warmed up = andmonitor .. Look at temps of the head = Front and back .. temps of the top of the radiator etc.
They should have simular temps all across with a working thermostat and flowing water.... 180- 190 - 200 alll fair.. Its when you start pushing over 220 that its really getting Hot.
|
|
Total posts: 7050
Last post: Apr 10, 2024 Member since:May 23, 2002
|
Cars in Garage: 0
Photos: 0 WorkBench Posts: 0 |
|
"Retired: No Job, No Money, Wife and I! Will travel anywhere for Minis"
|
|
Total posts: 9241
Last post: Aug 17, 2023 Member since:Jun 5, 2000
|
Cars in Garage: 0
Photos: 0 WorkBench Posts: 0 |
|
The smoke is not going to be from the engine itself being hot. It is probably from oil dripping onto the exhaust pipes.
Boiling over can be caused by several things. Start with the cheap stuff. Inspect the fan (post a picture of it here showing the blade curvature). Check the tension of the fan belt. With the engine at temperature, measure the temperature of the thermostat housing and the radiator header tank. Let us know what it measures.
You can fit a higher pressure rated radiator cap. The cap will NOT lower the operating temperature of the engine but it will delay or prevent it reaching boil over.
Don't overfill the radiator with coolant. If you fill it to the top, it will burp out some coolant when you stop the engine.
If nothing is revealed in checking these things it might be a stuck thermostat. A thermostat for a mid-1970s Chevy will fit and work fine. (See this old thread link: https://www.minimania.com/msgThread/111135/1/1/Thermostat_cross_reference )
The cap and thermostat are relatively inexpensive. Once you get past that you move into more expensive components and more labor to change parts. Again, start with the cheap stuff.
|
|
Total posts: 333
Last post: Apr 13, 2024 Member since:Jan 22, 2018
|
Cars in Garage: 0
Photos: 0 WorkBench Posts: 0 |
|
|
Total posts: 1124
Last post: Jan 12, 2024 Member since:May 13, 2002
|
Cars in Garage: 0
Photos: 0 WorkBench Posts: 0 |
|
I'd start by changing the thermostat to 74 degrees.
overheating can be caused by lots of things, timing, running lean, collapsed exhaust, binding brakes, loose fan belt, incorrect radiator cap, stuffed radiator etc etc.......
|
|
Total posts: 4
Last post: Mar 29, 2020 Member since:Mar 26, 2020
|
Cars in Garage: 0
Photos: 0 WorkBench Posts: 0 |


