
| Orig. Posting Date | User Name | Edit Date |
| Feb 11, 2018 09:15PM | Derwood | |
| Feb 11, 2018 08:09PM | Derwood | Edited: Feb 11, 2018 08:18PM |
| Feb 11, 2018 07:01PM | Derwood | |
| Feb 11, 2018 06:14PM | onetim | Edited: Feb 11, 2018 06:19PM |
| Feb 11, 2018 03:29PM | bluebox | |
| Feb 11, 2018 06:48AM | Dan Moffet | |
| Feb 10, 2018 03:27PM | Derwood | |
| Feb 10, 2018 06:31AM | Dan Moffet | |
| Feb 9, 2018 05:26PM | Dan Moffet | Edited: Feb 9, 2018 05:29PM |
| Feb 9, 2018 05:23PM | Dan Moffet | |
| Feb 9, 2018 02:41PM | bluebox | |
| Feb 9, 2018 12:38PM | Derwood | |
| Feb 9, 2018 11:28AM | bluebox | |
| Feb 9, 2018 10:43AM | 6464 | |
| Feb 9, 2018 04:28AM | Derwood | |
| Feb 8, 2018 06:59PM | kd | |
| Feb 8, 2018 04:26PM | Derwood | |
| Feb 8, 2018 03:17PM | Dan Moffet | |
| Feb 8, 2018 01:54PM | Derwood |

|
Total posts: 332
Last post: Sep 25, 2021 Member since:Jul 13, 2017
|
Cars in Garage: 0
Photos: 0 WorkBench Posts: 0 |
I’ve just noticed and commented on the pictures that Deb posted for me, so disregard my last post ??.
|
|
Total posts: 332
Last post: Sep 25, 2021 Member since:Jul 13, 2017
|
Cars in Garage: 0
Photos: 0 WorkBench Posts: 0 |
BTW- if someone would have a bit of time to help me post a few photos of my Mini , I will finally have shared some pictures of the car I chose. I have tried to post some pictures but have given up for now. If this is a large or bothersome request, be assured that I won’t be hurt or offended that no one wants to start a thread of about 8 pictures. Eventually I will figure it out. Unless I am limited by my iPad ? I have no other “device “, such as a laptop. If someone is up to doing this for me, fire off an email to me at : [email protected] and I will send two emails back, each with 4 pics. More than this amount of pics per email can sometimes take too long it seems. And btw, the email I just posted is one of 3 that I have, and I very seldom use it. Therefore I can simply delete it if I start receiving emails from a dating site in Siberia etc. No sweat. Anyway, it is time for me to get some shuteye. I see my cat has already turned in for the night.... Cheers my friends, Darren. PS- I have spent most of the day putting my first parts order together today. About 20 items will be ordered in the morning - I have finally decided on the things that I am going to do to make it somewhat unique and more interesting than a silver Mini with minilite style alloys. I’ve got to source a few more items ( such as a large tach for my steering column ) , but I am quite sure that I can find what I need in Canada...possibly even locally. Soon my Mini will have the look I have planned for it.
|
|
Total posts: 332
Last post: Sep 25, 2021 Member since:Jul 13, 2017
|
Cars in Garage: 0
Photos: 0 WorkBench Posts: 0 |
Thank you very much for that information onetim ! It’s really only the last year that I’ve notice a BIG difference in his walking. A few days ago he dropped in to my place for a visit, and being on the second floor, I couldn’t get over the trouble he had with the stairs. I’ve been working on him to get to the doctor and get on the waiting list. He seemed like he was ready for it ( mentally ) as he said, “ I don’t want the surgery yet,but I do want on the list “. I certainly didn’t say the obvious, that new knee joints are good for 20+ years , but I believe his doctor will see how bad his knees are and try to convince him that NOW would be a great time to get it done.... I am making this a priority, and will be mentioning it to my two brothers as well, so that they can do thier part too, in speeding Dad up on the knee replacement surgery. I’m very happy for you and your father, and that is what I want for my father ??. Thank you very much onetim. I look forward to telling you that he is scheduled for those new knees. You are very kind my friend ! Wishing you and your father the very best, Darren. PS- Your post has made my day. ??
|
|
Total posts: 1007
Last post: Jul 19, 2022 Member since:Jul 24, 2014
|
Cars in Garage: 0
Photos: 0 WorkBench Posts: 0 |
Darrin, have your dad replace his knees. My dad needed them at 80 got them at 90, within 3 months apart of each other. Kicks himself for not doing them when he first needed them, but he can now. 

|
|
Total posts: 1276
Last post: Nov 26, 2018 Member since:Feb 17, 2005
|
Cars in Garage: 0
Photos: 0 WorkBench Posts: 0 |
|
I agree 100% with Dan.
|
|
Total posts: 9542
Last post: Apr 18, 2024 Member since:Aug 14, 2002
|
Cars in Garage: 0
Photos: 0 WorkBench Posts: 0 |
|
Darren, from my experience, mudflaps are worse than no mudflaps. Besides rusting at the fasteners, they hold dirt and moisture between the flap and the body metal. When you consider the small size of Mini tires and how close to the ground the sills and floor are, any grit or stones thrown up glance off the sills at a very acute angle mostly harmlessly. Rather than welding (which invites rust in its own way) on metal strips, consider coating the sills or even the entire floor with one of the stone-guard coatings. If the colours available don't suit, they can be painted over to match the car colour.
I think you will find that dirt on the sills is much less of a problem than you imagine.
I think you will find that dirt on the sills is much less of a problem than you imagine.
.
"Hang on a minute lads....I've got a great idea."
|
|
Total posts: 332
Last post: Sep 25, 2021 Member since:Jul 13, 2017
|
Cars in Garage: 0
Photos: 0 WorkBench Posts: 0 |
Don and Dan, thank you for the Lee Valley information. I recall my father ordering from this company some years ago when he was a bit younger ( he will turn 80 in August, and is thankfully in great shape except for for his knees ) and was pursuing different projects at that point in his life. I just like to patronize Canadian companies when possible. The duty-free part is simply a bonus. This reply is a bit against the odds considering how Dan didn’t mind me mistakenly calling him Don, and yet my reply is to both Don and Dan....I obviously have too much time on my hands and not enough classic Mini lubricant. Thanks also for the info on the rare earth magnets. I do have a package of them in my tool kit, but unfortunately none are shaped well for being added to the oil drain plug, and I really don’t trust epoxy to keep a rare earth magnet attached to the plug. Also they are too small to be effective for my front mud flaps project. Current thoughts include having a 2 inch strip of steel welded along the lowest point on the firewall, positioned so that one inch is below the floorline, leaving me with this strip to affix my home- made mudflaps to with some quality nuts, bolts and washers. I’ve seen so many front wheel drive cars with the forward section of the sills chipped ( and then getting rusty ) for me not to try and improve the situation on my Mini.
Cheers and greetings friends, Darren.
|
|
Total posts: 9542
Last post: Apr 18, 2024 Member since:Aug 14, 2002
|
Cars in Garage: 0
Photos: 0 WorkBench Posts: 0 |
|
Quote:
Originally Posted by Derwood
Greetings fellow Earthlings. Dan, I want to apologize for spelling your name as Don
.
"Hang on a minute lads....I've got a great idea."
|
|
Total posts: 9542
Last post: Apr 18, 2024 Member since:Aug 14, 2002
|
Cars in Garage: 0
Photos: 0 WorkBench Posts: 0 |
|
Rare earth magnets
//www.leevalley.com/en/home/Search.aspx?action=n
round rare earth magnets:
//www.leevalley.com/en/wood/page.aspx?p=32065&cat=1,42363,42348
//www.leevalley.com/en/home/Search.aspx?action=n
round rare earth magnets:
//www.leevalley.com/en/wood/page.aspx?p=32065&cat=1,42363,42348
.
"Hang on a minute lads....I've got a great idea."
|
|
Total posts: 9542
Last post: Apr 18, 2024 Member since:Aug 14, 2002
|
Cars in Garage: 0
Photos: 0 WorkBench Posts: 0 |
|
Yes Lee Valley Tools is a great Canadian company, started right here in Ottawa by Leonard Lee as a retirement activity. He was a woodworker that sought out the best tools. When his friends wanted tools as good as the ones he found, they got him to source them. From there the company grew to a multimillion dollar international concern, including designing and manufacturing their own Veritas brand. They even went into medical tools.
https://www.leevalley.com/
https://www.leevalley.com/
.
"Hang on a minute lads....I've got a great idea."
|
|
Total posts: 1276
Last post: Nov 26, 2018 Member since:Feb 17, 2005
|
Cars in Garage: 0
Photos: 0 WorkBench Posts: 0 |
|
Darren, Lee Valley is Canadian. Now the make up of my gearbox is a little different than yours.I have a central pickup tube, which means that when I put the magnet on the oil drain plug it already had a long shaft with a spring on the end to hold the rod type rare earth magnet. If you put a couple of magnets on the bottom of your oil filter, you will catch most of the metal scarf.If you make your mud flaps and use magnets to hold them in place, you could take them off if you were showing your car. Cheers
|
|
Total posts: 332
Last post: Sep 25, 2021 Member since:Jul 13, 2017
|
Cars in Garage: 0
Photos: 0 WorkBench Posts: 0 |
Greetings fellow Earthlings. Dan, I want to apologize for spelling your name as Don several times in my reply to your post. I wish I could blame it on the usual culprit - autospell - but although that does cause me innumerable typing errors , my brain was at fault this time ! So sorry. 6464, I did find the plastic liners ( CAMLO1 ) at Mini Mania. As you mention , there is plenty of extra material to pop-rivet some home-made mudflaps onto. But my gosh are they expensive for the bit of plastic that they are. But still, if they protect our favourite car from rust...they are worth considering. I really do need to think about this purchase. While I’ll likely buy a set, they will only go on the front , and not the rears. Debbie had also warned me of the cost. I guess I’ll decide later. Don , it’s amazing how strong those rare Earfh magnets are ! I read somewhere within the last year or so that someone had epoxied a rare-Earth magnet to thier oil drain plug. Is this how you attached yours ? As a final question , is Lee Valley a Canadian company ? I ask because I cringe at how much money duty can add. But I guess if the product is made in Mexico or the USA there is no duty under the NAFTA agreement. So as long as it’s made in Canada, USA, or Mexico then i needn’t worry about duty. But did you use epoxy ? Thanks for the help friends, enjoy the weekend; Darren.
|
|
Total posts: 1276
Last post: Nov 26, 2018 Member since:Feb 17, 2005
|
Cars in Garage: 0
Photos: 0 WorkBench Posts: 0 |
|
Darren don't forget about magnets. Look up Lee Valley, rare earth magnets. Some will hold 60 Lbs. I use a number of them on Bluebox. Oil drain plug, the bottom of the oil filter, clutch and brake res. ,windshield washer bottle, hood prop. arm. So if you don't use the inner plastic fender ,you could use magnets to hold the mud flaps. Just don't get them anywhere near your credit cards,it will wipe them out. Yes I know through experience! Cheers
|
|
Total posts: 1723
Last post: Oct 20, 2020 Member since:Jun 18, 1999
|
Cars in Garage: 0
Photos: 0 WorkBench Posts: 0 |
|
Don't worry about the mud guards, just put the camlos plastic liners in the front wings. If you really want the guards , you can pop rivet the guards on to the camlos . They have to be screwed on.
|
|
Total posts: 332
Last post: Sep 25, 2021 Member since:Jul 13, 2017
|
Cars in Garage: 0
Photos: 0 WorkBench Posts: 0 |
Debbie, thank for sharing ! Would you be able to find and post a picture of them ? I’m not sure where I saw them, but the fact that you and Keith found them so effective tells me that they must be a worthy piece of kit. This may tie into anouther idea I had , but couldn’t figure a good way to install. I’m talking about adding small mud guards for the front wheels, to protect at least some of the front section of the sills from stone chips etc. My problem has been how do I mount them without drilling into the lower section of the firewall at roughly where the firewall meets the floor pan. Seems tricky at best, but perhaps some small ( 2 or 3 inch ) mudflats could be attached to the rear of these liners. This would give me the protection I want without creating holes that might let water into the car . So pictures and/or the source that supplied them would be great, because I figure that they are likely worth the expense to help keep my Mini in great shape. I’ll spend some time today trying to find where I saw them, and maybe between the two of us we could post pictures of the liners and the name of a supplier. Although your minis might be put away at some hard to access area, but if you could snap a photo or two of them on the car ( might also require too much bending/dexterity to be doable. In any event, let’s see what we can find and post ( I may have to send them to you to post if you don’t mind ,as I’m still unable to post pictures. Thank you Debbie and Keith ! Great input ! Cheers all, Darren. PS- if anyone else has suggestions on how to protect the inside of the sills, or mount some home-made front mudflaps, please add your knowledge to this thread. Let’s keep our minis solid !!
|
|
Total posts: 1398
Last post: Dec 25, 2020 Member since:Mar 9, 2000
|
Cars in Garage: 0
Photos: 0 WorkBench Posts: 0 |
|
Darren,
We install the plastic inner fenders on all are Minis.
Even on my Riley Elf.
on later Minis the heater piping runs in the fenders and mud and dirt splash up on to the area near the windshield fresh air intake.
The scuttle panel then rusts out.
Inner fenders solve this problem.
they are light but bulky so expensive to ship.
Deb
Keith & Deb
Avatar:Turn 1 at the Glen
|
|
Total posts: 332
Last post: Sep 25, 2021 Member since:Jul 13, 2017
|
Cars in Garage: 0
Photos: 0 WorkBench Posts: 0 |
Thanks Don. Your images make it clear to see how these drains are supposed to work ( especially the one with your orange door showing above the sill area ). Now, a few more questions. Do these openings in the A panel at approximately cowl level still exist inside the front fenders, ready to catch all that the driven wheels can throw up into them ? Or were they closed off at the factory after some point in time ? As you can imagine, my concerns are keeping them rust free. I believe it is obvious that these must all be regularly checked to make sure they are not clogged ( ? ). When I started my hunt for a good mini I had figured that I would attempt to keep rust at bay by first thouroly washing the underside of the car and them after all is dried I would try that British product called Waxoyl. It seems to stay put ( the wax- oyl ) rather than thin away to almost nothing like some rust prevention “stuff” seems to. My plan all along has been to buy either a 1/2 gallon , or a full gallon of waxoyl and buying proper equipment to spray it into small openings , chambers, subframe, Boot seams and corners, and etc. Do you think this would be an effective yearly anti-corrosion regime ? Any and all suggestions will be given serious consideration. Is it true that each mini door only has one drain hole ? If so, wouldn’t it be a better idea to add a couple more ? Thank you very much Don ! Most excellent. Cheers all. Darren.
PS- would it be wise, or unwise to spray into these 6 ( per side ) drains during regular washings ? This seems like a rather tricky area to protect....
PPS- I’ve read in a mini sales site recently that there is a company making and selling plastic inner fender inserts for the mini.....hmmmmm.....possibly good...possibly a trap for muck.
|
|
Total posts: 9542
Last post: Apr 18, 2024 Member since:Aug 14, 2002
|
Cars in Garage: 0
Photos: 0 WorkBench Posts: 0 |
|
Image Gallery
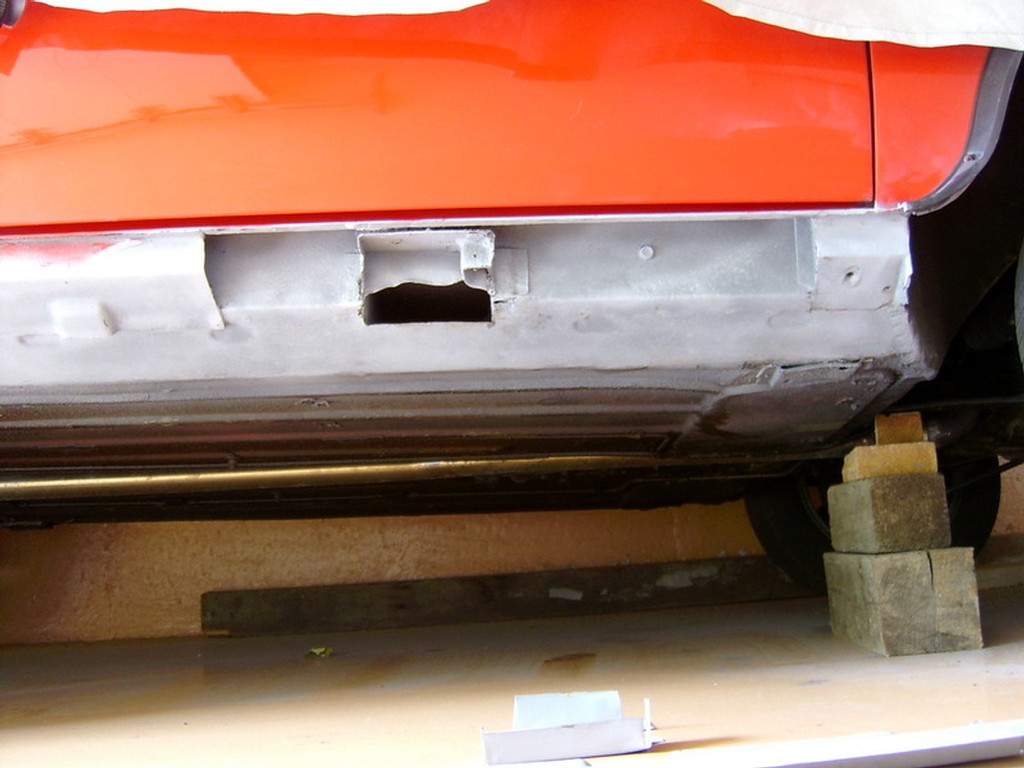
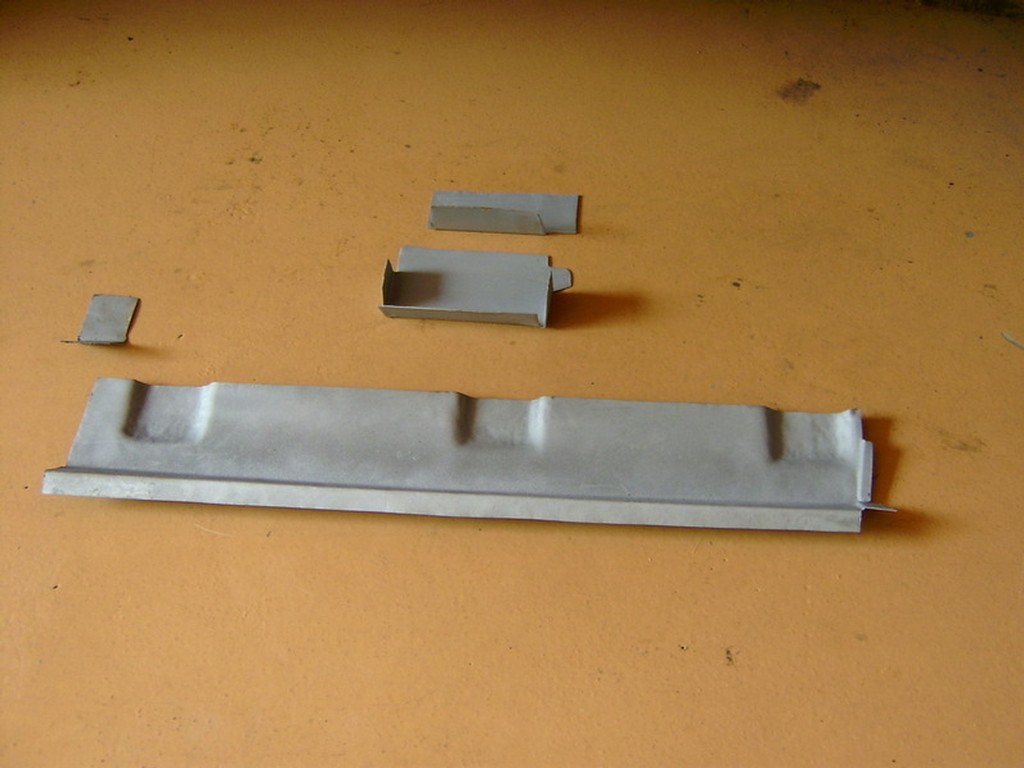

In the first picture, you can see the open end of the floor cross-member, which contained the jacking pocket (which one should never use anyway). Being open-bottomed, the jacking pocket is just another ingress point for water. I decided to omit it. You can also see how the floor turns up to form the inner part of the sill. Luckily, my door frame portion of the sill was not affected.
.
"Hang on a minute lads....I've got a great idea."
|
|
Total posts: 332
Last post: Sep 25, 2021 Member since:Jul 13, 2017
|
Cars in Garage: 0
Photos: 0 WorkBench Posts: 0 |
Hi all. Hope everyone is well. Once again the rookie is seeking knowledge ( me, of course ). I’ve never been able to figure out what the raised openings on the rockers ( sills ) of a Mini are for. This issue has dogged me for years, but last night I downloaded a Mini Owners Guide to see what information I could glean and also to simply pass some time. Under the ventilation section the guide shows these as vents.... ( ? ) Seems like they might actually catch water, but that is obviously not their purpose. Could someone please shed light on these “openings” for me please ? I’m thinking that someone who has replaced sills might be able to explain the purpose of them. Or perhaps someone has read the reason for them ( I simply don’t trust what I read last night ). Finally, do these create an opening into the car ? Should the be regularly be checked to make sure they remain open ( similar to the holes at the bottom of the doors ) ? And do they require any special anti-rust attention ? Thanks and Cheers, Darren.


