|
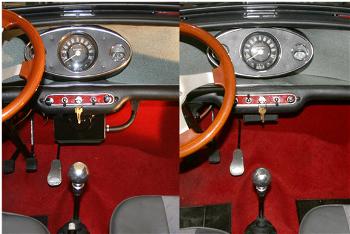
Where'd the heater go? The new T7 makes a lot more room for your toes, and a lot more heat for them too. Installing Mini Mania's T7 Lightweight Heater into the Classic MiniUnder the dash lurked a multi-tubed Medusa that spat rust and Prestone at all who entered. I lacked the courage to slay the beast, though my frozen piggies begged for warmth. The more I researched replacing the Mini heater the more confusing it became. The choices out there are set up differently by several previous owners and a dozen repair shops with wildly creative electrical, venting, plumbing, corrosion, and mineral deposit variations.
MiniMania is the first in the US to carry it, and Jemal Ketat at Minimania and I got the first two in the US.
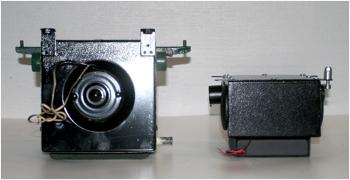
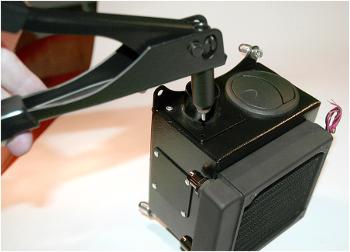
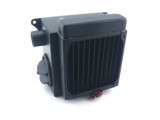
Tiny, light and simple, the T7 (right) packs a punch over the heavy, leaking, rusty original.
Why not just patch it or buy a core?You can dream of saving a few quid and painstakingly remove your heater, disassemble, remove the core, rebuild the motor and paint it as I did over a whole weekend. Convince your wife that the five-dollar miracle of JB-Weld will patch your core good as new. Monday morning on the way to work my exquisite JB-Weld repair of the old core exploded sitting in traffic. Commuters turned to see some dude performing Baryshnikov on the center median with his feet steaming, then crawl back into an equally steamy, tiny car. After my socks dried enough to plug in the laptop an email went to T7's Adam Mudge. His line of powerful micro heaters were gobbled up by the Land Rover guys first, then the caravan and camper crowds as auxilliaries. They happen to be perfect for the Classic Mini. Adam is a great help and will handle every question you have.
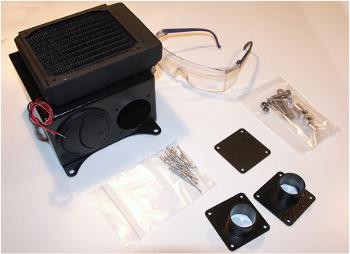
There's really not much to it. Plug in water and volts and get warm. What to OrderIf you have dash vents, your heater has four 1.25" output ducts: two for the vents and two for the defrosters. Since I'm a Mk 1 I just have defrosters, so the non-dash-vent one I ordered comes with two ducts for the defrosters, and two spiffy aimable vents instead of ducts. The T7 is recirculating and will not use the inlet duct coming in from the engine compartment.
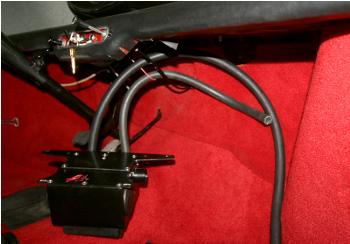
Right side view as they would sit in the car, firewall towards the right. Installing the ducts After unpacking your T7 there's some minor assembly. The T7 box has five open outputs, so they supply an extra blanking plate for the back vent that you won't use. You'll put your ducts on with the supplied blind rivets. If you don't have a small-size blind-rivet tool, nip down to Home Depot and they're about $15. Rivet the blanking plate onto the back, and the output ducts on the side as shown here:
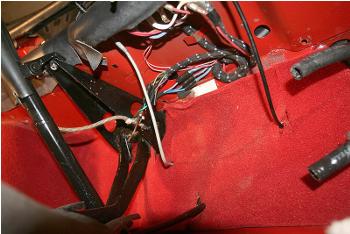
Put a rivet in the tool, push it into the hole and squeeze twice. Note the back blanking plate installed below. Surgery Prep Now to evict your current tenant. First, the electrical preparations, since your metal heater is next to your open switch panel connectors:
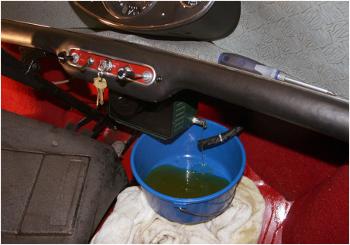
Since I didn't do any of this I now start the car with the wiper switch, activate the left turn signal by turning the key, and for the horn I just touch my tongue to the steering column. Draining the patient A little bucket in the footwell handles the coolant in your core and heater hoses. No more than a pint - unlike what I hear about the MiniMania holiday party. At Home Depot was a perfect little blue bucket. It also comes in handy for my rear seat passengers when I start talking politics. The core doesn't get flushed out regularly like the rest of the cooling system. Don't spill what comes out; I expected to see Jimmy Hoffa in there. The 50 year-old heater got satisfying revenge for being moved to the shelf. I yanked off an inlet hose without waiting for the system to cool after the drive to Home Depot. Wise husbands have learned over the years to suppress their screams of pain from the garage. You'll only remind her that the garage contains not just a four-wheeled money pit, but an idiot.
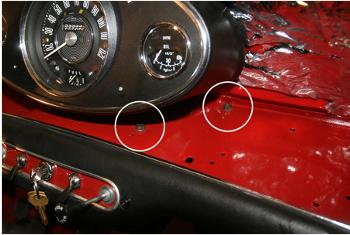
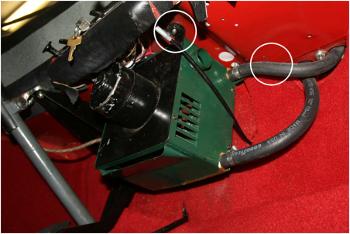
Bottom core inlet hose draining. The pain subsided soon after. Note the gray underside of the carpet I left in just because I was too lazy to unscrew the gearshift boot. For the love of God man, take out the bloody carpet. My reward was to have to take it all out anyway and then scrub out Prestone on the driveway. Removing the old heater With both water hoses unplugged you can hit the four 7/16" nuts from the top instead of going under. This is for Mk 1, your arrangement may vary:
Without these bolts your old heater will have little to grab on to while it fights to stay put, like most politicians. It will try to snag as many underdash wires as it can, mostly the choke and heater pull cables. Don't drop it because Jimmy Hoffa's pinkie will fall out.
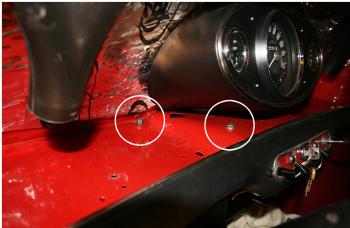
The same mounting bolts from the bottom. The right side dash bolts above are circled; the one on the right is hiding behind the hose. These are blind nuts welded into the factory bracket, so you don't have to look underneath or touch them.
With the top bolts undone the old heater pleads for clemency, a death grip on the choke cable and steering column loom connectors.
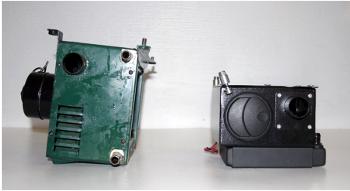
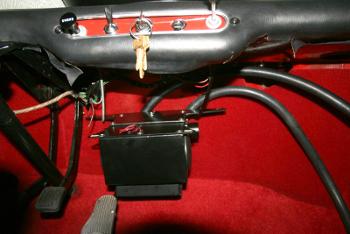
A blank slate. Now recheck the wiring connectors. In with the new I discovered I needed more 1/2" hose for two reasons: 1. The T7 is so much smaller that its core fittings are several inches further away. 2. The old hose was easy to kink and twist. This hose is common, cheap and hanging around most auto parts stores, like the Kardashians at 5:00 AM. Get at least six feet and cut it in half, and stick both on the T7 core. A little grease helps to get it over the inlets.
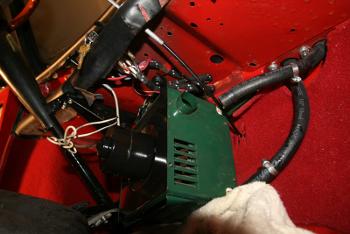
You can use your old hose clamps. It's possible for you to do all this while sitting straight up, without the usual torturous underdash contortions. Point the heater with the hoses facing toward the firewall and get the wide part of the bracket clear of (in between) the choke and heater cables. Note that the hoses are looped over the right side heater cable.
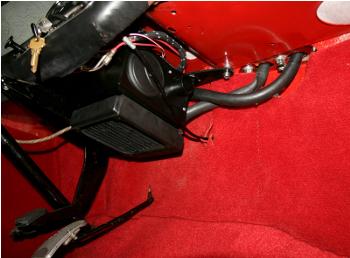
The T7 is light enough to hang from the cables so you can do a last check of the wiring loom and switch panel connectors up top. The T7's included spacers provide an inch of clearance atop the heater for the wiring loom. You shouldn't have to push hard. Just go straight up and with your other hand try to get a bolt through one of the bracket holes into the matching dash hole.
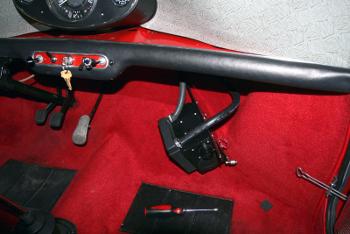
Below is the first bolt, the right front bracket. You can see the spacer between the black bracket and the dash. You're all done after the other three bolts, with only electrical remaining. This picture also shows why to replace your heater hose. Note that where it goes up through the firewall, the left hose is twisted. The new hose on the right is fine. I could only tell this after seeing this picture. Feel around the harness on top to make sure no wires have been pulled tight. Notice my harness is loosely sitting on top of the heater. This is another advantage of the T7; since it's aluminum you're not going to incinerate anything up there.
We're done!I used T7's own demister ducting since mine was long gone. It fits perfectly on the outlets and bends sharp corners on the dash without kinking. Now for those red and black wires. Hook them to the switch of your choice or order up MM's Lucas Rheostat for adjustable speed. Get this Classic Mini Heater. Things are about to get warm and dry.
|
Installing Mini Mania's Lightweight Heater into the Classic Mini
-
 24A1898-N$335.95
 -
COOLING01$3.16
-
2A9129$24.95
-
78405-KNOB$5.45
-
78405$51.95