The basic problems with the Minor's lever shocks are: you have to disassemble the suspension to change them, they don't work well, and they're too expensive! Our easy, bolt-on kit (NDV103/MS) enables you to add modern telescoping shocks to the rear of any year Morris Minor.
Your Minor is unique; it was assembled by humans, not robots! There are dimensional differences between all Minors that make the fitting of any after market kit not as straightforward as we would all like. Be prepared to adapt the car, or parts of this kit, to suit your car.
1) Jack up the rear of the car and support with axle stands under the BODY – not under the axle! Remove both of the old damper linkage rods from the chassis joint. Undo the axle U bolts and remove both lower spring plates, complete with the damper units. Clean the exposed area of spring with a wire brush.
2) Ensure the axle remains located onto the spring pins on top of the springs; now fit the new spring plates with the folded section downwards, towards the car centre, with the largest section to the rear. Align the plate with the length and tighten the axle U bolts evenly. The holes are slotted to allow for different axles that may be fitted. i.e. Marina, Fords, Celica etc.
3) The cross member goes under the boot floor, that is on the outside, not in the boot! Check the width of the cross member against the distance between the chassis rails approximately in line with the bump stop plate on the chassis. This dimension varies from car to car so trim the cross member ends to a snug fit and make sure it can sit tight up against the floor pan itself (where it touches between the indentations), this will mean removing some of the existing under seal etc. Be sure to re-seal it after fitting. The approximate position is shown in the instructions, take this as a guide only and follow the proper procedure for location in para. 5 below.
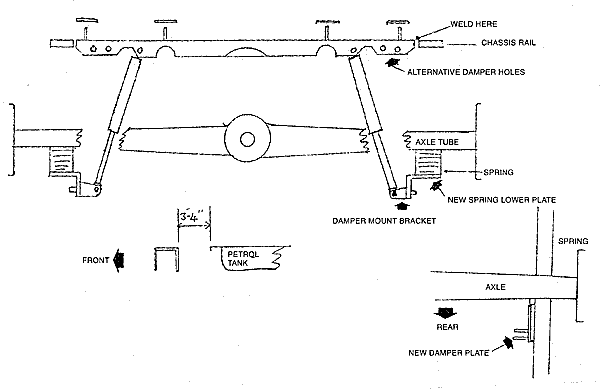
4) There are 3 pairs of holes in the cross member for the top damper bolts, normally the pair closest to the centre are used; but depending on the position of the exhaust, the running height of the car, number of spring leaves etc. you will have to judge which pair are best for your set up. Likewise with the bottom plate, there are 2 sets of holes for the damper bracket, only you can find the best position to avoid the damper topping or bottoming in use.
5) Connect up the top the dampers to the cross member, packing out each side of the damper eye with the thick washers as required. Position under the car with the large central cut-away facing forwards, this is for clearance over the diff. Loosely connect dampers to the lower brackets and plates and extend the whole assembly until the cross member is up against the boot floor. The final positioning is a matter of judgement; but it is more important to align the dampers vertically as practical (when viewed from the side), so they sit as "comfortably " as possible. The other cut-always in the cross member are to help with exhaust pipe clearance etc.
6) Having satisfied yourself as to the correct location, mark on the floor pan the 4 holes in the cross member, remove the cross member, remove the cross member and drill through with a 10mm drill. Wear safety goggles and gloves, as there will be a lot of hot swarf flying around. De-burr the holes on the inside and you can finally bolt the whole thing into position using the large washers on the inside. Tighten all remaining fixings. For maximum rigidity, weld the cross member ends only to the chassis sides. Do not weld to the floor pan across the width of the car; this will only cause stress cracking of the floor.